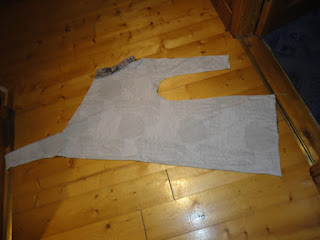
This is the quickest dress I have ever made- but probably the funkiest. It is based on Japanese twisted cut approach and I used the pattern, published by my seamstress colleague on Burdastyle.com.
 The fabric is a simple cotton jersey with a lovely floral and asian writing print ( suits the occasion actually) . it is a great project for an hour long sew along ( please join in)
Here is how it's done:
First you need to download the pattern, kindly provided by Julia (apfelbluete) from Burdastyle.com
Step 1: Fold your fabric lengthwise ( along the grain) and place the pattern on the fold line
Step 2: Cut the fabric along the pattern line ( the seam allowances of 1cm are included, the bottom hem is 4cm), sew the side seams and the shoulder seams. Remember the stretch fabrics must be either serged or sewn with a narrow zigzag stitch on your sewing machine to stay stretchy. You must use special ballpoint machine needles for jersey.
Step 3: If you wish to add a narrow sleeve on the wide side for the symmetry like I did, measure the sleeve armhole (while still folded like above) Draw the sleeve on a piece of fabric, folded along the grain line, wide part corresponding with the armhole measurement you took, the lower edge copied from the other sleeve. The length of the sleeve must be measured separately. Just try the dress on and decide how long the sleeve should be. Mine was 32 cm long. Draw a line between the two outer edges of the sleeve along the length, gradully making it narrower as you go lower.
Here is your sleeve done:
Step 5: Now I added a little standing collar. If you want to follow me- measure the neckline circumstance and cut a piece of fabric double the height of desired collar and add 1cm allowances to the measurement you took
Stitch the side seam of the collar and fold it lengthwise - raw edges together, right side out.
Place the collar inside your neckline- all open edges together. Align the seam on the collar with the shoulder seam or the centre back ( you'll have to determine where it is yourself). Stitch it all together along the neckline. Press. This is how it looks now on the inside:
Step 6: All what's left are the hems- fold the bottom 4cm on to the wrong side and stitch either with a special kersey double needle or a zigzag stitch on your sewing machine. Stretch the fabric as you sew a bit for flexibility. The same on the sleeves, but only fold about 2 cm hem . Trim the excess of the hem over the stitch on the wrong side to eliminate the bulk close to the stitch- I usually leave about 4mm.
And here it is - a Japanese twister dress in less than an hour:


You are one hot tamale!!
ReplyDeleteThe dress is so nice. I have already downloaded the pattern :)
ReplyDeletehi, I love this dress but I can't access the free pattern to try it. please email it to me if you can. Many thanks
ReplyDelete